How to do a CA Request and Get a Certificate
As a reminder, here is the certification process explained. This process can be done either in the Portecle add-on we provide, or with another generator available like openssl, IIS, online sites, or CA provider’s applications.
1. Reminder - Certification process
The certificates are delivered by the Certificates Authorities (CA). This is a 3-step process.
a) The generation of a Key Pair or Private Key in standard RSA 2048 bits. This key will be used to generate a CA Request based on it.
b) The CA Request generated is transmitted to the CA. It contains all the necessary information to the provider to deliver a certificate (Country Name 2 letters code, State or Province Full Name, Locality Name, Organization Name e.g Company, Organization Unit Name e.g Section, valid email address and Common Name (CN) e.g. MyDomainName.com).
The main job consists in creating the Request which will correctly inquire a form asking for all the information listed above.
c) The Certificate authority verifies the information you transmitted and returns the certificate, and eventually also intermediate Certificates that are required to access your certificate. The certificate also contains the CA Reply (the validated Private Key). Once you have the certificate, the CA reply, its key pair (private key), and the intermediate certificates, they must be imported in the keystore handled by Terminal Service Plus.
2. How to generate a CSR (Certificate Signing Request)
In this tutorial, we will learn how to install a certificate in the Terminal Service Plus Web Server, providing users the security of HTTPS, 2048 SSL encryption and Domain name certification. In order to receive an SSL Certificate we recommend you purchase it from a trusted vendor as GoDaddy or DigiCert. Please follow the this procedure to order and install your SSL on the TSplus Gateway / Server.
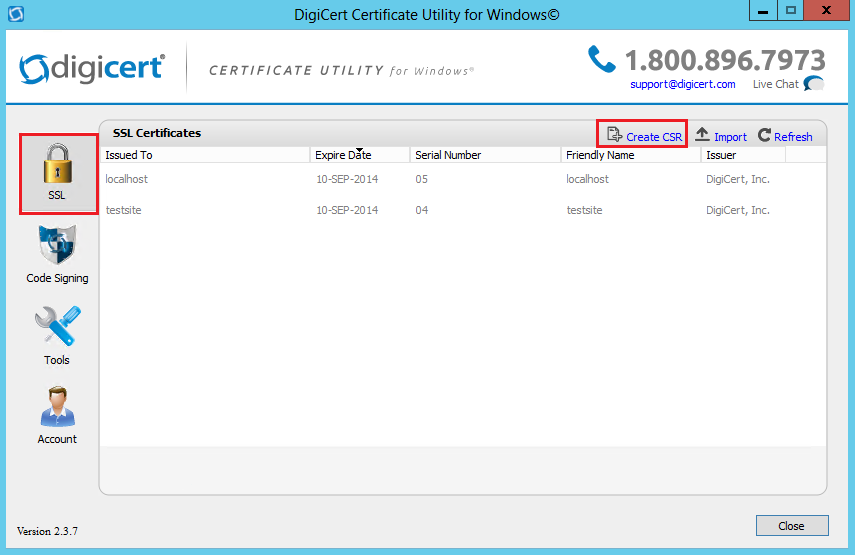
To create a CSR with the DigiCert Utility, follow the steps below:
- On your Windows Server, download and save the DigiCert Certificate Utility for Windows executable (DigiCertUtil.exe).
- Run the DigiCert Certificate Utility for Windows (double-click DigiCertUtil).
- In the DigiCert Certificate Utility for Windows©, click SSL (gold lock), and then click Create CSR.
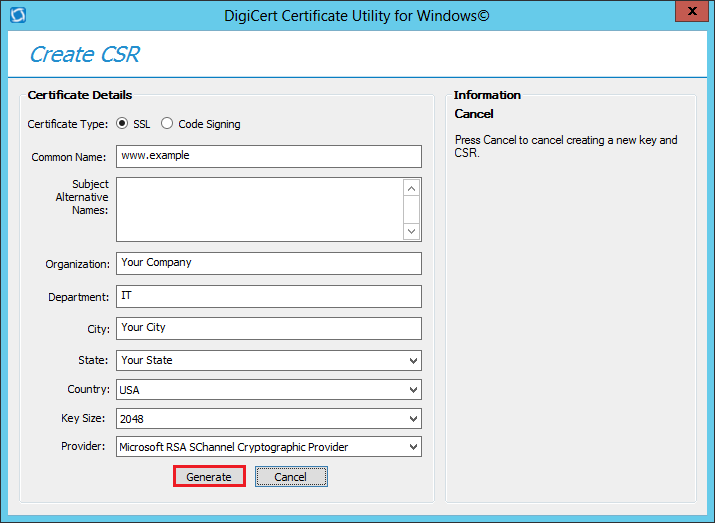
 4. On the Create CSR page, provide the following information below and then click Generate:
Certificate Type: Select SSL. Common Name: Enter the fully-qualified domain name (FQDN) (e.g., www.example.com). Subject Alternative Names: If you are requesting a Multi-Domain (SAN) Certificate, enter any SANs that you want to include (e.g., www.example.com, www.example2.com, and www.example3.net). Organization: Enter your company’s legally registered name (e.g., YourCompany, Inc.). Department: (Optional) If you want, enter the name of your department within the organization or you can simply leave the box blank. City: Enter the city where your company is legally located. State: Use the drop-down list to select the state where your company is legally located. Note: If your company is located outside the US, you can type the applicable name in the box. Country: Use the drop-down list to select the country where your company is legally located. Key Size: In the drop-down list, select 2048 (unless you have a specific reason for using a larger bit length). Provider: In the drop-down list, select Microsoft RSA SChannel Cryptographic Provider (unless you have a specific cryptographic provider).
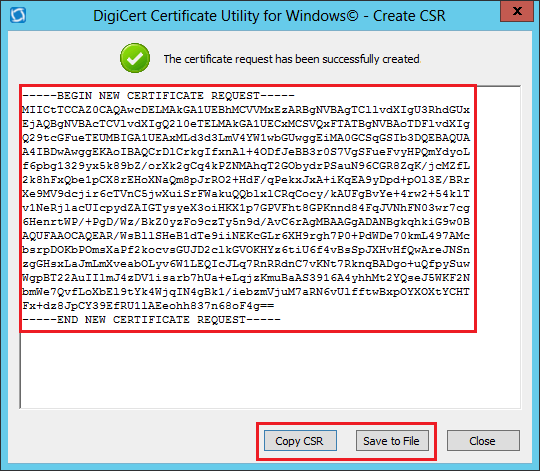
 6. On the DigiCert Certificate Utility for Windows© - Create CSR page, do one of the following and then click Close:
Click Copy CSR. Copies the certificate contents to the clipboard. Use this option if you are ready to paste the CSR into the DigiCert order form. Note: Because the DigiCert Certificate Utility does not store CSRs, we recommend you paste the CSR into a text editor (such as Notepad) when using this option. If you close the CSR page and accidentally overwrite the clipboard contents without doing this, you will need to generate a new CSR.
Click Save to File. Saves the CSR as a .txt file to the Windows Server 2012. (We recommend using this option.)
-
Use a text editor (such as Notepad) to open the file. Then, copy the text, including the -----BEGIN NEW CERTIFICATE REQUEST----- and -----END NEW CERTIFICATE REQUEST----- tags, and paste it into the DigiCert order form.
-
After you receive your SSL Certificate from DigiCert, you can use the DigiCert Certificate Utility for Windows to install it.
3. How do I generate what I need for TSplus?
- Open the DigiCert Application a) click on SSL b) Import your SSL You will now see the cert that you have installed is highlighted:
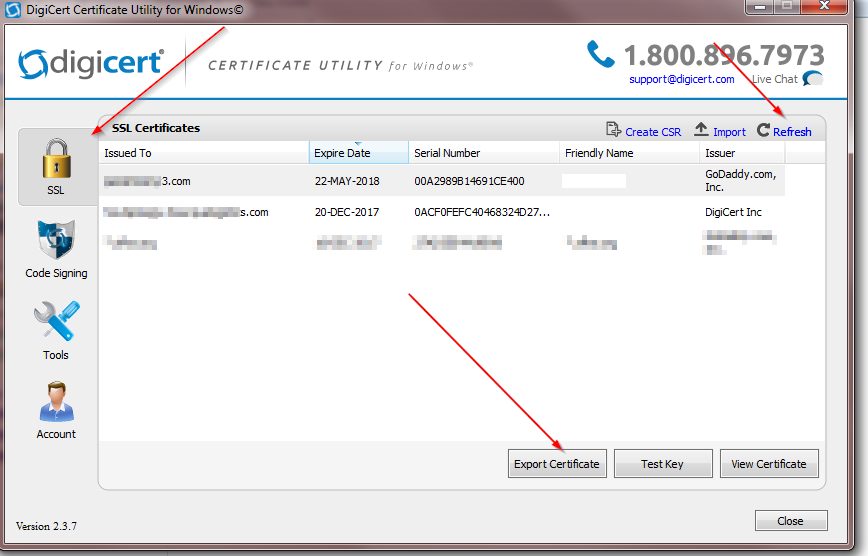
On the bottom of the GUI you will see the button “Export Certificate”, click on it.
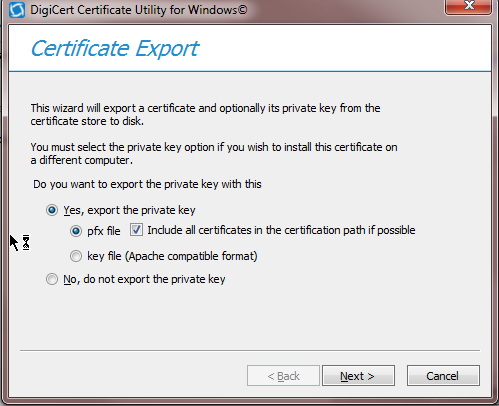
Ensure that “Yes, export the private key and pfx file / Include all certificates in the certification path if possible are checked off.
Next, Save the file in the folder with the certs that you have unzipped.
You MUST USE THE PASSWORD ‘secret’.
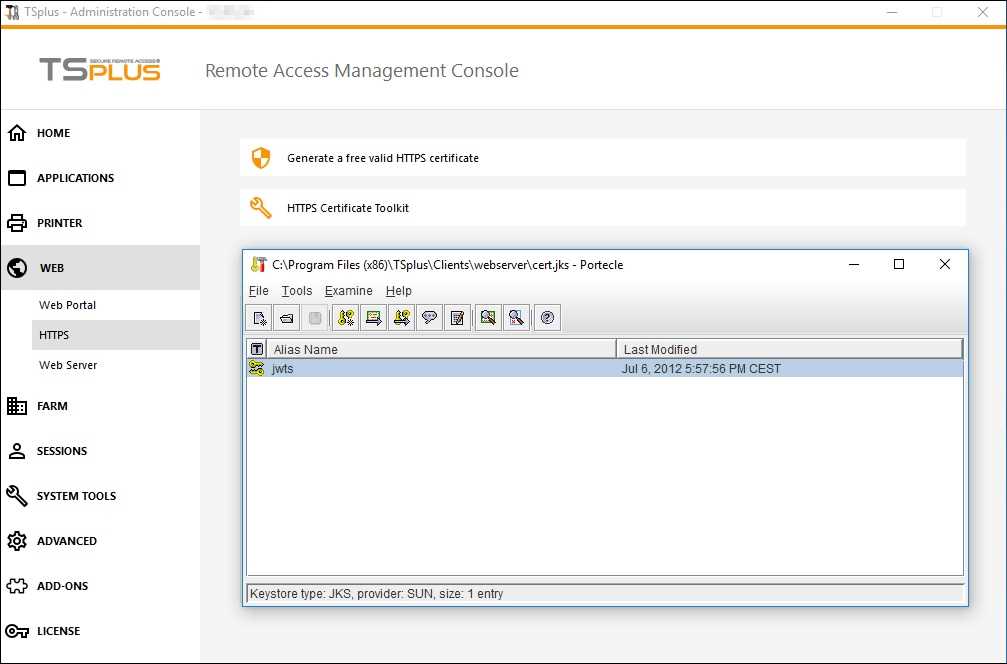
4. How do I install the certs on the the TSplus Web Server?
- Copy the un-ziped file which now contains .pfk and crt files to the TSplus Server Program Files (x86)\TSplus\Clients\webserver
- Make a copy of the cert.jks
- From the TSplus Admin Console / Web / HTTPS / HTTPS Certificate Toolkit / File / Open Keystore File “cert.jks” Password is secret Delete the jwts Tools Import Key Pair (you will find it in the folder you have just copied) When prompted for the Alias name it must be
jwts and the password secret
Tools Import Trusted Certificate and import the crt that you have in the folder. Close the tool and ensure that the cert.jks is saved with the password secret. TSplus Admin Console / Web and restart the services. You have now completed the SSL Cert procedure.