Load Balancing
Pre-requisites
Using this feature, you will be able to manage a load balanced environment.
It means that the load of all your users will be distributed between your servers. The workload will be shared between all the servers of your farm.
Load Balancing enables to use an unlimited number of servers with load balancing, and is available with the Enterprise edition (one valid license per server). This very powerful and advanced capability is to be used when a large number of users/servers has to be deployed.
Important : Simply enabling Load Balancing will redirect users to the least loaded server of the farm regardless of any assigned servers configured for the users. If you intent to use Load Balancing AND Server Assignment, make sure to tick the checkbox “Load balance on assigned servers”
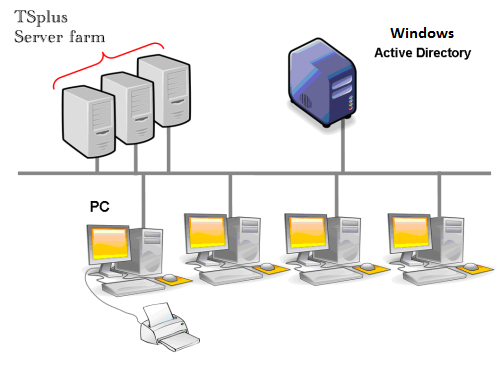
Usually we recommend using one server for 50 concurrent users.
You can exceed +50 users depending on the power of your server and the consumption of users’ application resources.
Generated Clients and Web Access
There are three ways to connect to a Load Balanced cluster:
- Using a Generated Client (executable program, created by the Portable Client Generator)
- Using a Web Portal Access by activating it on the Web Portal Preferences window.
- With the TSplus App from your mobile device.
Load Balancing Main Window
The Load Balancing Manager can be found under the Farm Tab of the AdminTool:
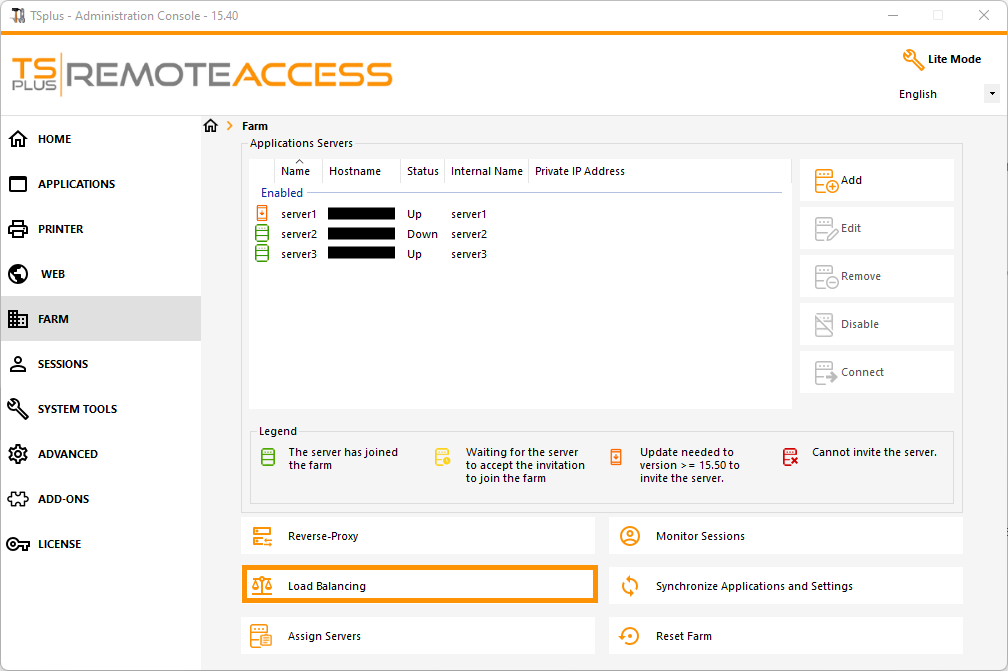
This window allows you to configure Load Balancing. It lists all the servers in your Load Balanced server farm and allows you to enable, disable and configure the Load Balancing (more on this below).
Click on the buttons in the picture below to access the corresponding information:
On top of the Load Balancing window, you will see a big button:
- This button displays the current state of the Load Balancing.
- If you click on it, it will enable or disable the Load Balancing depending on its current state.
Here is the button when the Load Balancing is Disabled. A click on it will activate it.

Here is the button when the Load Balancing is Enabled. A click on it will deactivate it.

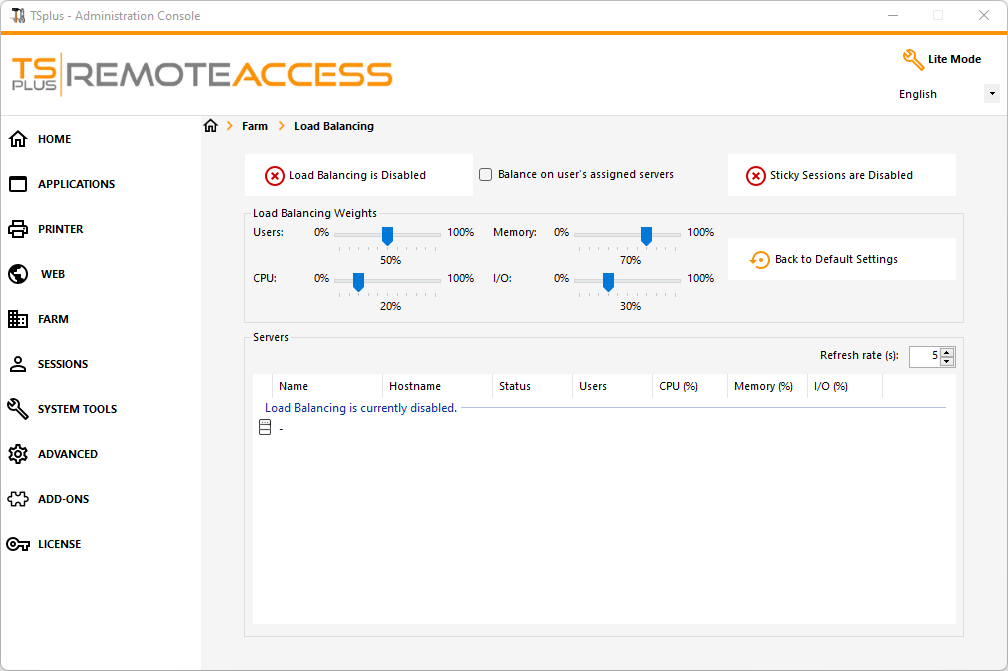
How does Load Balancing choose a server?
When Load Balancing is enabled, the user will be sent to the less loaded server at the time of his connection.
To determinate which is the less loaded server, the load of every server is computed using a weighted average between several performance indicators:
- number of connected users
- processor usage
- memory usage
- disk usage
You can modify the weight (importance) of these indicators by using the following sliders:

Using these sliders, you will be able to fine-tune the Load Balancing, and to optimize it to your own needs. For instance if your users launch a business application with big memory requirements, it might be a good idea to increase the impact of the RAM in the load computation using the “Memory” slider.
You can also reset these values by clicking on the “Back to Default Settings” button.
How is Server’s Load computed?
The load of each server is computed when needed in order to decide on which server the user must be sent.
For this computation, we use a weighted average between 4 hardware metrics.
The 4 sliders allow you to give more (or less) weight on each of these metrics, which are:
- Users : number of connected users
- CPU : percentage of non-idle processor time
- Memory : percentage of used memory
- I/O : percentage of non-idle disk time
For example, if you put the “Memory” slider on its right side and all the other sliders on their left side, the load of each servers will be computed using almost only the percentage of used memory - and your users will be sent to the server having the most available memory.
- When a slider is completely on the left, the weight used in load computation will be 1.
- When a slider is completely on the left, the weight used in load computation will be 100.
Moreover, the load of a given server depends on the ratio [ used resources / total resources ] ; so if a server A is twice as powerful as a server B, twice more users should be sent to server A than to server B (all other things being equals).
You can see the list of Load-Balanced Servers Status and details on the performances indicators of each server.
The servers are sorted from the less loaded to the most loaded according to your configuration.
The list of Load-Balanced Servers Status is automatically refreshed. This automatic refresh stops if the connection becomes unavailable. You can change the refresh rate at the top right corner of the “Server” box.
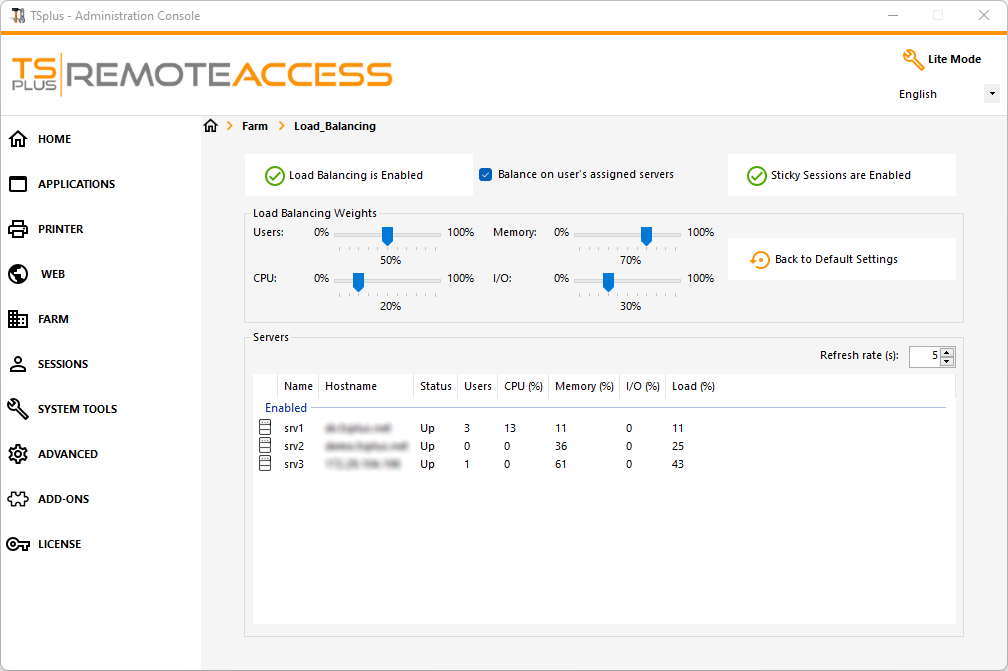
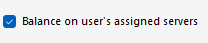
Load-balancing can also be done directly on user’s assigned server using the checkbox “Balance on user’s assigned servers”.
As a result, you will be able to load-balance on accounting department servers only for accountant users, once these specific servers have been assigned to the accountant users.
You can activate the sticky session feature by clicking on the right button of the Load balancing window:

Enabling existing sessions web listing is required for Load Balancing Sticky Sessions feature.
It will allow you to reconnect to a disconnected session instead of opening a new session on a different server.
To enable existing sessions web listing, set the following setting to “no”.
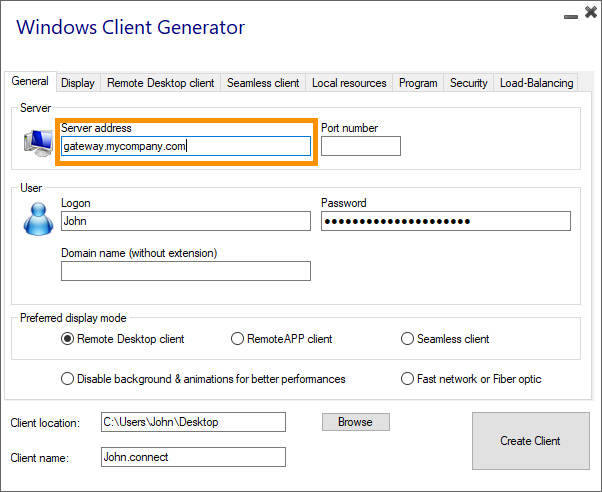
Load Balancing using a Connection Client
If you want to generate a Connection Client for a user to connect to the less loaded server, you will need from the Client Generator in the “Load-Balancing” tab to:
- Check the “Use Load-Balancing” checkbox
- Fill in the “Gateway Web port number” field with the HTTP or HTTPS port used by your Gateway Server
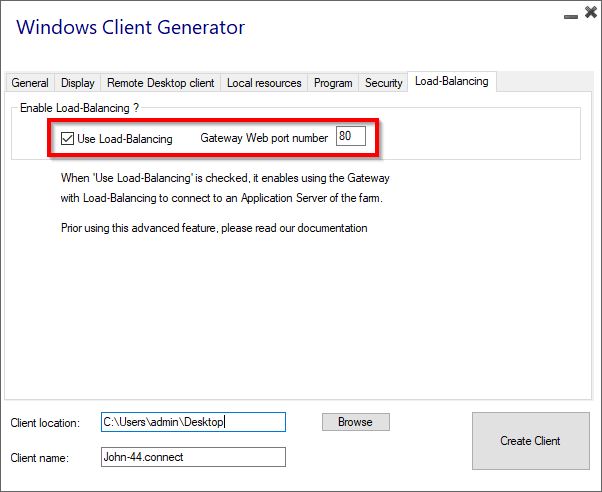
- Use the public IP address or hostname of your Gateway Server directly in the “Server” field.