Funzionalità di Bilanciamento del Carico
Requisiti preliminari
Utilizzando questa funzione, sarai in grado di gestire un ambiente bilanciato.
Significa che il carico di tutti i tuoi utenti sarà distribuito tra i tuoi server. Il carico di lavoro sarà condiviso tra tutti i server della tua farm.
Il bilanciamento del carico consente di utilizzare un numero illimitato di server con bilanciamento del carico ed è disponibile con l'edizione Enterprise (una licenza valida per server). Questa capacità molto potente e avanzata deve essere utilizzata quando deve essere distribuito un gran numero di utenti/server.
Attenzione: il bilanciamento del carico non è compatibile con la funzionalità Gateway (che consente di assegnare server a utenti/gruppi, vedere questa documentazione per ulteriori informazioni.)
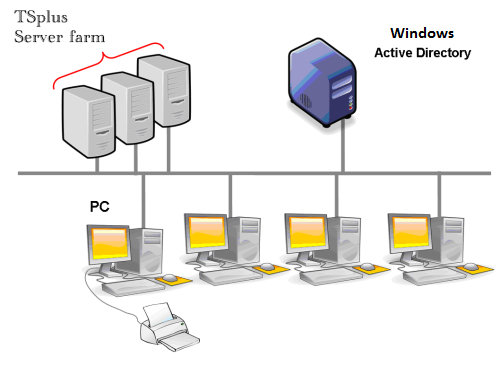 Di solito raccomandiamo di utilizzare un server per 50 utenti concorrenti. Per applicazioni commerciali standard scritte in VB, C, C++, Delphi o Uniface puoi arrivare fino a 100 utenti concorrenti, specialmente se decidi di utilizzare XP a 64 bit che, secondo la nostra esperienza, supera la maggior parte dei sistemi operativi forniti da Microsoft. XP o Windows 7 sono sistemi operativi molto più stabili. Per W7, raccomandiamo di utilizzare la versione a 64 bit.
Clienti generati e accesso web
Ci sono tre modi per connettersi a un cluster bilanciato:
- Utilizzando un Cliente generato programma eseguibile, creato dal Generatore di Client Portatile )
- Utilizzando un Accesso al Portale Web attivandolo nella finestra delle Preferenze del Portale Web.
- Con il TSplus App dal tuo dispositivo mobile.
Finestra principale di bilanciamento del carico
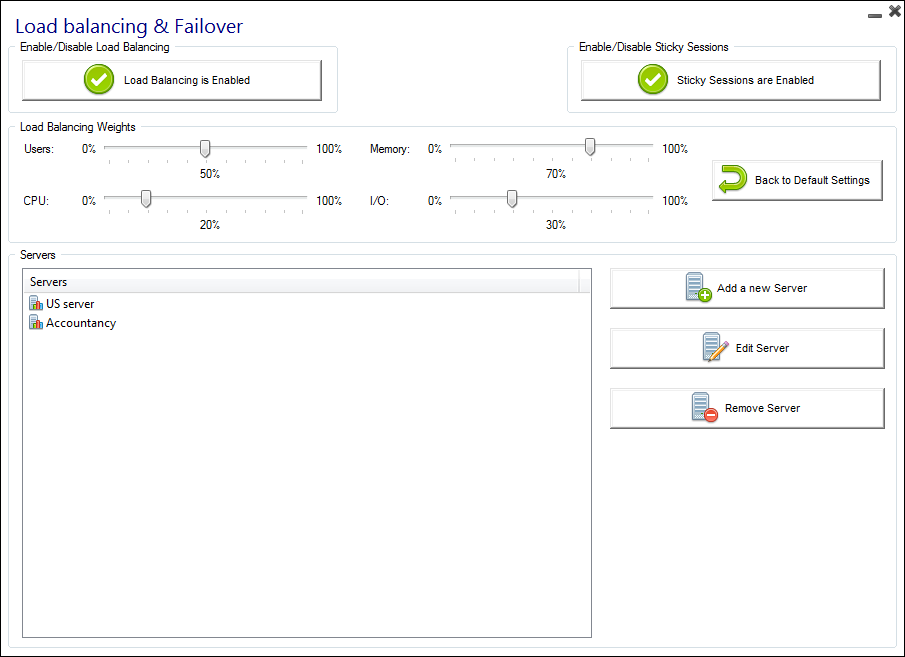
Il Load Balancing Manager può essere trovato sotto la scheda Farm dell'AdminTool:
 La finestra principale consente di configurare il bilanciamento del carico. Elenca tutti i server nella tua farm di server bilanciati e ti consente di aggiungere un nuovo server (facendo clic sul pulsante "Aggiungi un nuovo server") o visualizzare un server esistente (facendo clic su di esso). Consente inoltre di abilitare, disabilitare e configurare il bilanciamento del carico (maggiori informazioni su questo di seguito).
Clicca sui pulsanti nell'immagine qui sotto per accedere alle informazioni corrispondenti:
Abilitazione/Disabilitazione del bilanciamento del carico
In cima alla finestra di Bilanciamento del Carico, vedrai un grande pulsante:
- Questo pulsante visualizza lo stato attuale del bilanciamento del carico.
- Se fai clic su di esso, abiliterà o disabiliterà il bilanciamento del carico a seconda del suo stato attuale.
Ecco il pulsante quando il bilanciamento del carico è Disabilitato Un clic su di esso lo attiverà e disabiliterà il Assegnazione Utenti/Server .
 Ecco il pulsante quando il bilanciamento del carico è
Abilitato
Un clic su di esso lo disattiverà e abiliterà il
Assegnazione Utenti/Server
.
 ### Come sceglie un server il bilanciamento del carico?
Quando il bilanciamento del carico è abilitato, l'utente verrà inviato al server meno carico al momento della sua connessione.
Configurazione del calcolo dei carichi dei server
Per determinare quale sia il server meno carico, il carico di ogni server viene calcolato utilizzando una media ponderata tra diversi indicatori di prestazione:
- numero di utenti connessi
- utilizzo della CPU
- utilizzo della memoria
- utilizzo del disco
Puoi modificare il peso (importanza) di questi indicatori utilizzando i seguenti cursori:
 Utilizzando questi cursori, sarai in grado di affinare il bilanciamento del carico e ottimizzarlo secondo le tue esigenze. Ad esempio, se i tuoi utenti avviano un'applicazione aziendale con grandi requisiti di memoria, potrebbe essere una buona idea aumentare l'impatto della RAM nel calcolo del carico utilizzando il cursore "Memoria".
Puoi anche ripristinare questi valori facendo clic sul pulsante "Torna alle impostazioni predefinite".
Come viene calcolato il carico del server?
Il carico di ciascun server viene calcolato quando necessario per decidere a quale server l'utente deve essere inviato.
Per questo calcolo, utilizziamo un media ponderata tra 4 metriche hardware.
I 4 cursori ti permettono di dare più (o meno) peso a ciascuna di queste metriche, che sono:
- Utenti : numero di utenti connessi
- CPU : percentuale del tempo di elaborazione non inattivo
- Memoria : percentuale di memoria utilizzata
- I/O : percentuale di tempo di disco non inattivo
Ad esempio, se sposti il cursore "Memoria" sul lato destro e tutti gli altri cursori sul lato sinistro, il carico di ciascun server verrà calcolato utilizzando quasi esclusivamente la percentuale di memoria utilizzata - e i tuoi utenti verranno inviati al server con la maggiore memoria disponibile.
- Quando un cursore è completamente a sinistra, il peso utilizzato nel calcolo del carico sarà 1.
- Quando un cursore è completamente a sinistra, il peso utilizzato nel calcolo del carico sarà 100.
Inoltre, il carico di un determinato server dipende dal rapporto [ risorse utilizzate / risorse totali ]; quindi, se un server A è due volte più potente di un server B, dovrebbero essere inviati al server A il doppio degli utenti rispetto al server B (tutte le altre cose essendo uguali).
Aggiungere un nuovo Server
Per aggiungere un nuovo server, fai semplicemente clic sul pulsante "Aggiungi un nuovo Server". Verrà visualizzata la seguente finestra:
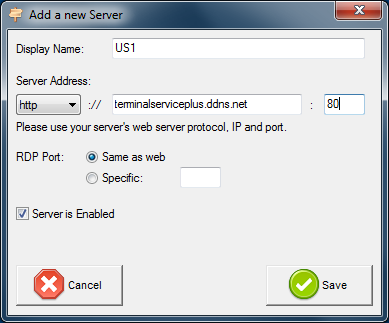 - Il "Nome visualizzato" è il titolo che verrà mostrato ai tuoi utenti sulla pagina HTML di Accesso Web. Si suppone che sia più user-friendly rispetto a un valore tecnico (come un IP), ad esempio "Server US" o "Zona Blu".
-
L'indirizzo del server è raggiungibile con le porte http o https.
-
Quando si utilizza il bilanciamento del carico, la "porta RDP" non verrà utilizzata. Viene utilizzata solo quando ci si connette utilizzando un client generato. Ti consigliamo di mantenere l'impostazione predefinita ("Stessa del web").
-
Hai anche la possibilità di abilitare o disabilitare il server.
Bilanciamento del carico solo sui server assegnati all'utente
Il bilanciamento del carico può essere effettuato direttamente sul server assegnato all'utente utilizzando la casella di controllo "Bilancia sui server assegnati all'utente". Di conseguenza, sarà possibile bilanciare il carico solo sui server del dipartimento contabile per gli utenti contabili, una volta che questi server specifici sono stati assegnati agli utenti contabili.
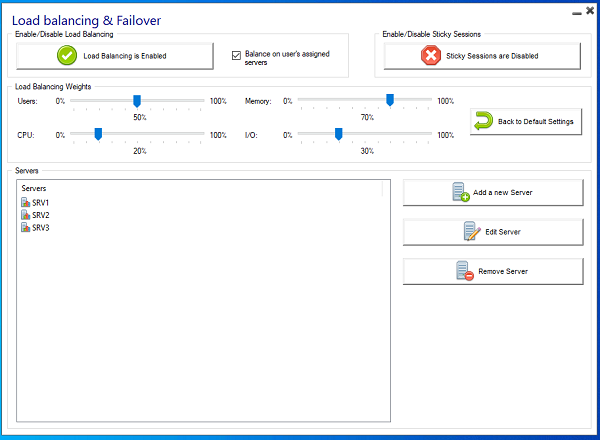 ### Modifica di un server esistente
Per modificare un server esistente, basta fare clic sul pulsante "Modifica" del server che si desidera aggiornare. Verrà visualizzata la seguente finestra:
 La barra di avanzamento mostra il carico attuale del server. Conferma anche che il server è ben configurato e può essere contattato dal Gateway.
Bilanciamento del carico utilizzando un client di connessione
Non stai utilizzando il ruolo di Reverse Proxy del Gateway (caso predefinito)Questo è il caso predefinito se hai appena installato Terminal Service Plus. In questo caso, se vuoi generare un Client di Connessione per connettersi a un determinato server di applicazioni , poi:
- Non selezionare la casella "Utilizza il bilanciamento del carico" nella scheda Gateway Portal del Generatore di Client di Connessione,
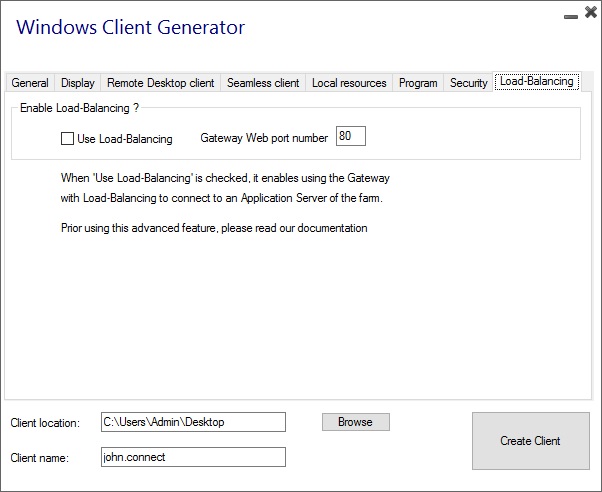 Usa l'indirizzo IP pubblico o il nome host del tuo Server Applicazioni direttamente nel campo "Server".
Tuttavia, se vuoi generare un Client di Connessione per connettersi al server meno carico e utilizzare il bilanciamento del carico, quindi:
- Controlla la casella "Usa bilanciamento del carico" nel Generatore di Clienti di Connessione,
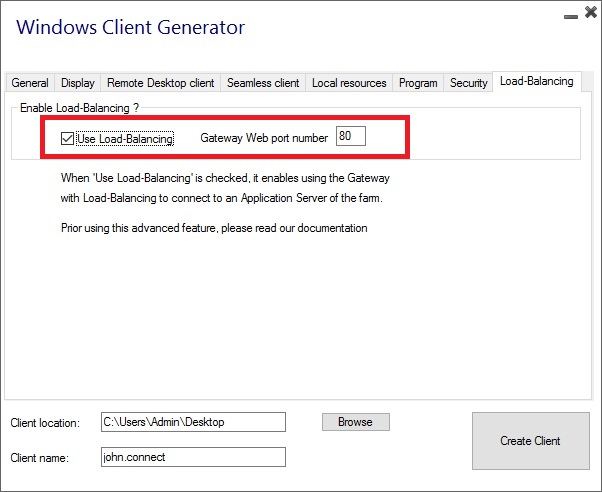 Usa l'indirizzo IP pubblico o il nome host del tuo Server Gateway direttamente nel campo "Server".
Vedi questa pagina .
Attivazione del bilanciamento del carico per l'accesso al Gateway Portal
Attivare il bilanciamento del carico è davvero facile. Ci vogliono solo tre passaggi:
-
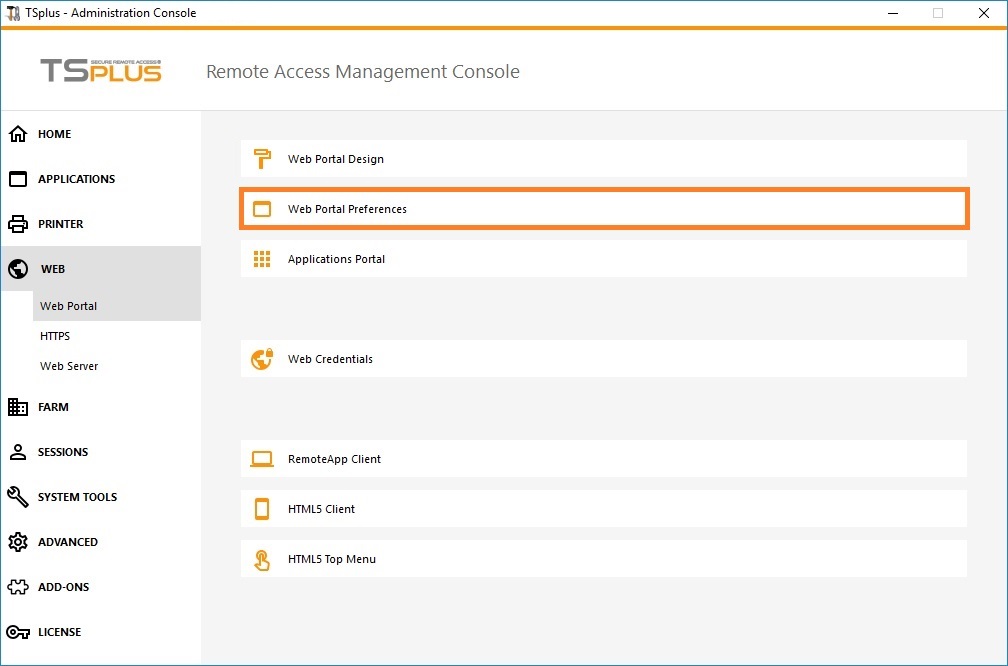
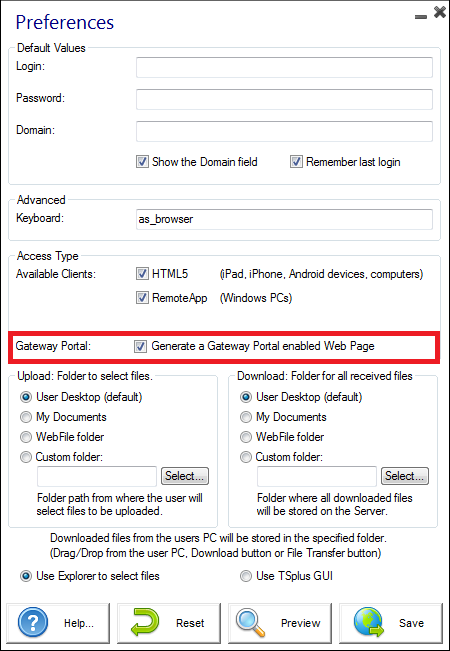
- Genera una pagina di Accesso Web con l'opzione "Genera una pagina Web del Gateway Portal abilitata" selezionata, facendo clic sulla tile delle Preferenze del Portale Web della scheda Web:
-
- Abilita il bilanciamento del carico facendo clic sul pulsante "Abilita/Disabilita bilanciamento del carico" (nella Load Balancing Manager, situata nella scheda Farm dell'AdminTool):


-
- Apri un browser e vai alla pagina di Accesso Web che hai generato nel passaggio 1 (per impostazione predefinita: http://localhost/index.html Dopo aver digitato un accesso, vedrai che la pagina di Accesso Web sceglie il server meno carico della tua farm :
 ### Attivazione della funzionalità di sessione persistente
Indipendentemente dal metodo di connessione, sarai sempre in grado di attivare la funzione di sessione persistente facendo clic sul pulsante destro della finestra di bilanciamento del carico:
 Ti permetterà di riconnetterti a una sessione disconnessa invece di aprire una nuova sessione su un server diverso.