TSplus Remote Access v17: Guida rapida
Prerequisiti :
Sul Server :
- OS: Microsoft Windows Versioni 7 a 11 o Windows Server 2008R2 a 2022 con almeno 2GB di RAM.
- TSplus non supporta l'installazione di Remote Access su Windows Home Editions.
- Il sistema operativo deve essere sull'unità C:
- Java Runtime Environment. Se Java non è già installato, Remote Access installerà OpenJDK durante la configurazione.
- Se si utilizza un sistema operativo Windows Server, assicurarsi che i ruoli TSE/RDS e TSE/RDSLicensing siano non installato .
- Il tuo server di Remote Access deve avere un indirizzo IP privato statico.
- Per l'accesso esterno, il tuo server deve avere un indirizzo IP pubblico statico o un fornitore di DNS dinamico.
- TSplus Remote Access server Web integrato richiede Java OpenJDK 17 o superiore. .
Sul Client :
- OS: Le versioni di Microsoft Windows da 7 a 11 sono completamente supportate.
- Per MacOS puoi utilizzare qualsiasi client RDP per Mac o il client HTML5 di TSplus.
- Per Linux puoi utilizzare Rdesktop o il client HTML5 di TSplus.
- Java Runtime Environment.
- Un lettore PDF (esempio: Foxit Reader o Acrobat DC)
Per ulteriori requisiti dettagliati, si prega di consultare la documentazione
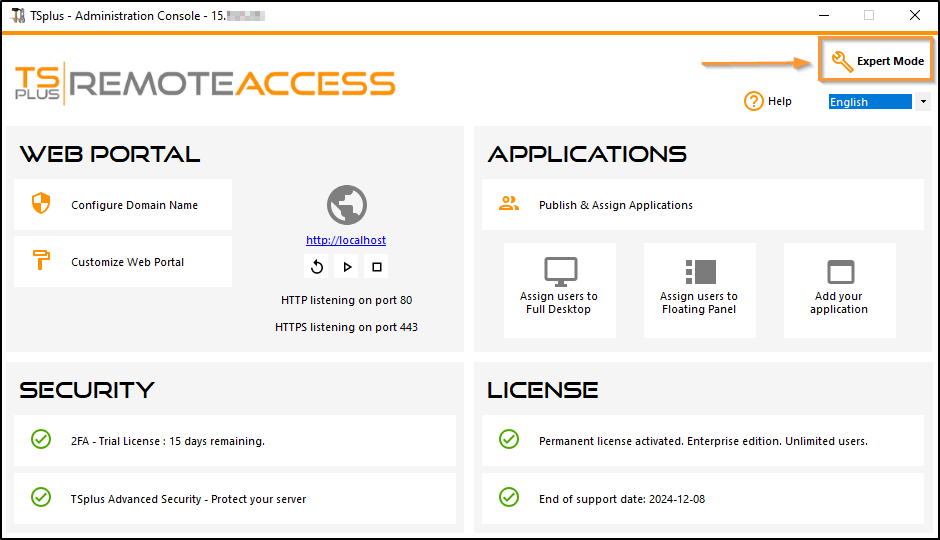
Nota: A partire dalla Versione 15 di Remote Access, la console di amministrazione ha cambiato aspetto. A Modalità Lite e un Modalità Esperto sono stati introdotti. Gli amministratori possono alternare tra i due stili di interfaccia facendo clic sul pulsante nell'angolo in alto a destra della Console di Amministrazione.
Passo 1: Installazione.
Nota: La versione di prova di Remote Access è l'Enterprise Edition completa di funzionalità. È concessa in licenza per un massimo di 5 utenti concorrenti per un periodo di 15 giorni.
Installare TSplus Remote Access è un processo semplice. Basta scaricarlo dal nostro sito web, eseguire il programma Setup-TSplus.exe.
I file vengono decompressi e copiati in:
-
C:\Program Files\TSplus (sistemi a 32 bit)
-
C:\Program Files(x86)\TSplus (sistemi a 64 bit).
Una volta completata l'installazione, l'installatore ti chiederà di riavviare.
Dopo il riavvio, vedrai 2 nuove icone sul tuo Desktop:
![]() L'AdminTool è ciò di cui hai bisogno per utilizzare Remote Access.
L'AdminTool è ciò di cui hai bisogno per utilizzare Remote Access.
![]() Il Generatore di Client Portatile viene utilizzato per creare client di connessione Remote Access per i tuoi utenti.
Il Generatore di Client Portatile viene utilizzato per creare client di connessione Remote Access per i tuoi utenti.
Vedi la documentazione per le istruzioni complete di installazione.
Passo 2: Creazione degli utenti.
Dopo il riavvio, il Server di Accesso Remoto è quasi pronto per partire. Ora creeremo gli utenti. Apri l'AdminTool per iniziare. Poi vai alla scheda Strumenti di Sistema e fai clic su "Utenti e Gruppi". Questo ti porterà alla finestra Utenti e Gruppi Locali.
![]()
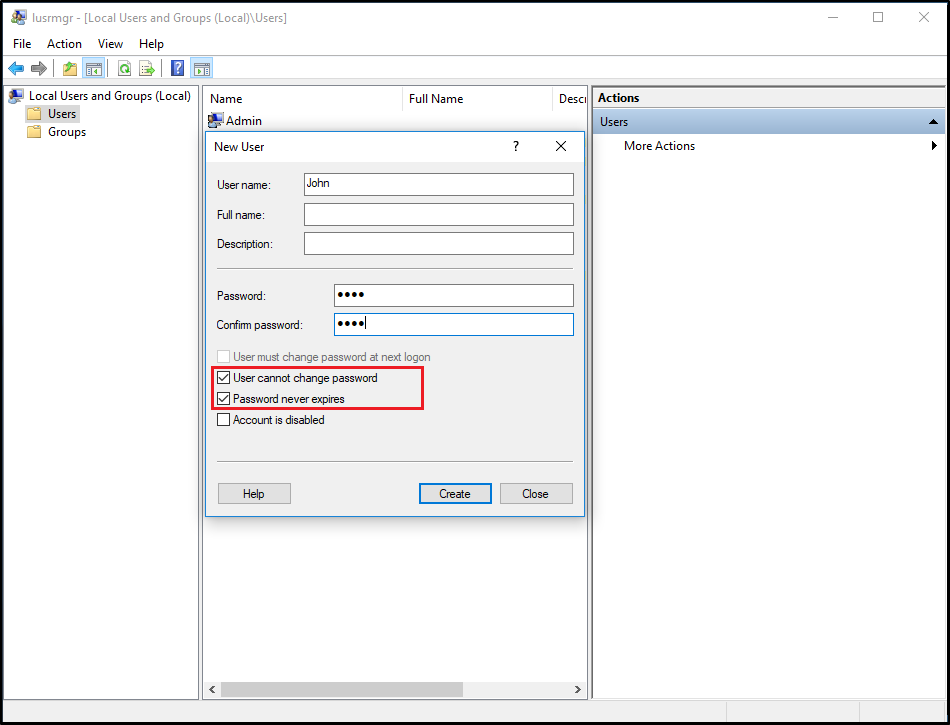
Ogni utente deve avere un Nome Utente E una Password. Quando crei utenti, fai attenzione alla casella etichettata "L'utente deve cambiare la password al prossimo accesso". Se non vuoi che i tuoi utenti cambino la loro password durante il primo accesso, deseleziona questa casella e seleziona "La password non scade mai" o "L'utente non può cambiare la password".
Passo 3: Seleziona il client più adatto alle tue esigenze.
Remote Access è compatibile con il protocollo Remote Desktop di Windows. Qualsiasi utente può connettersi localmente o da remoto con un client standard di connessione Desktop Remoto (mstsc.exe) o qualsiasi client compatibile con RDP. Per sfruttare appieno le funzionalità avanzate in Remote Access (RemoteApp, Stampa Universale…) puoi utilizzare un client generato o il Portale Web di Remote Access.
Remote Access è una soluzione molto flessibile e offre molteplici modi per aprire una sessione:
- Connessione Desktop Remoto Classica MSTSC.EXE.
- Client RDP portatile TSplus che mostrerà un ambiente finestrato per la tua connessione remota che puoi ridurre nella barra delle applicazioni di Windows.
- client MS RemoteAPP che visualizzerà l'applicazione utilizzando il nativo MS RemoteApp.
- client Windows sul Portale Web di TSplus.
- client HTML5 sul Portale Web di TSplus.
Questi clienti offrono all'utente la seguente esperienza:
Con Connessione Desktop Remoto (mstsc.exe)
- Connessione La connessione è una connessione molto standard. La Stampante Universale non è supportata con questo tipo di connessione.
- Visualizza Gli utenti vedranno la loro sessione all'interno di una finestra di Remote Desktop. Questo desktop visualizza il contenuto della cartella desktop dell'utente. Se l'amministratore ha assegnato applicazioni specifiche con l'AdminTool, verranno visualizzate solo queste applicazioni (nessuna barra delle applicazioni, nessun Desktop).
Questa è una soluzione unica di TSplus, che consente agli utenti locali e remoti di connettersi utilizzando un unico programma dedicato.
Include il programma di connessione, la funzionalità avanzata di Stampa Universale, portabilità con un alto livello di sicurezza mantenendo tutto molto semplice per gli utenti. Per ulteriori informazioni sull'uso del Generatore di Client TSplus, vedere
questa documentazione
Il Client generato da TSplus RemoteApp .
Le applicazioni remote appariranno e si comporteranno come un'applicazione locale. Invece di una classica finestra di Remote Desktop, sarai libero di passare tra le tue applicazioni locali e remote senza dover minimizzare una finestra di Remote Desktop. Per ulteriori informazioni su questi client, vedere questa documentazione .
Accedere al server TSplus Remote Access da una posizione remota
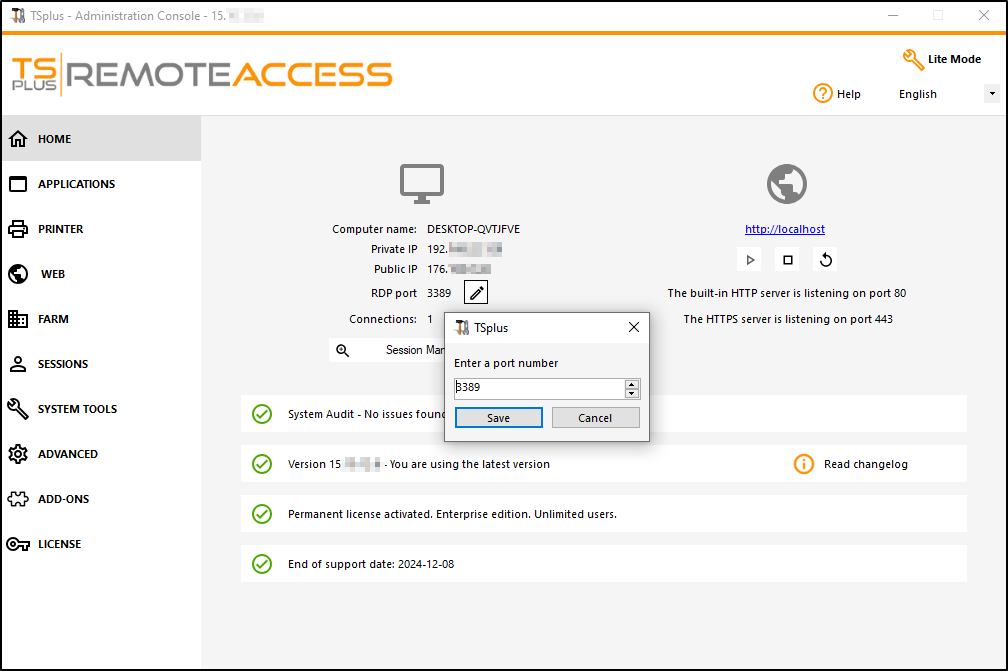
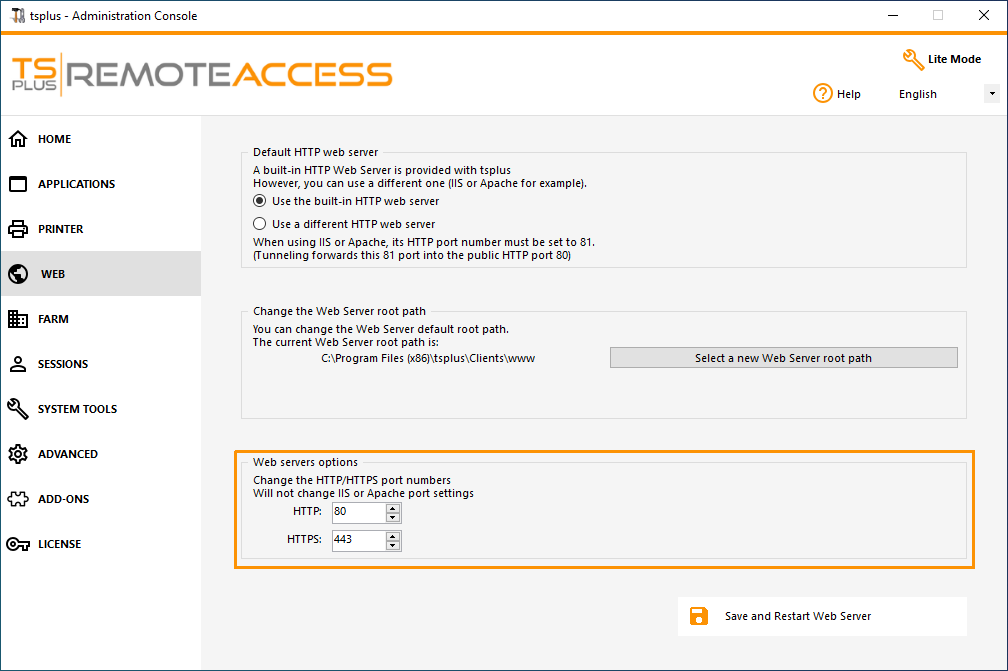
Per accedere al tuo server Remote Access da fuori della tua rete locale, dovrai creare una regola di port forwarding o port redirection per le porte 3389/80/443 a seconda del tuo metodo di connessione preferito. Puoi cambiare la porta RDP nella scheda Home:
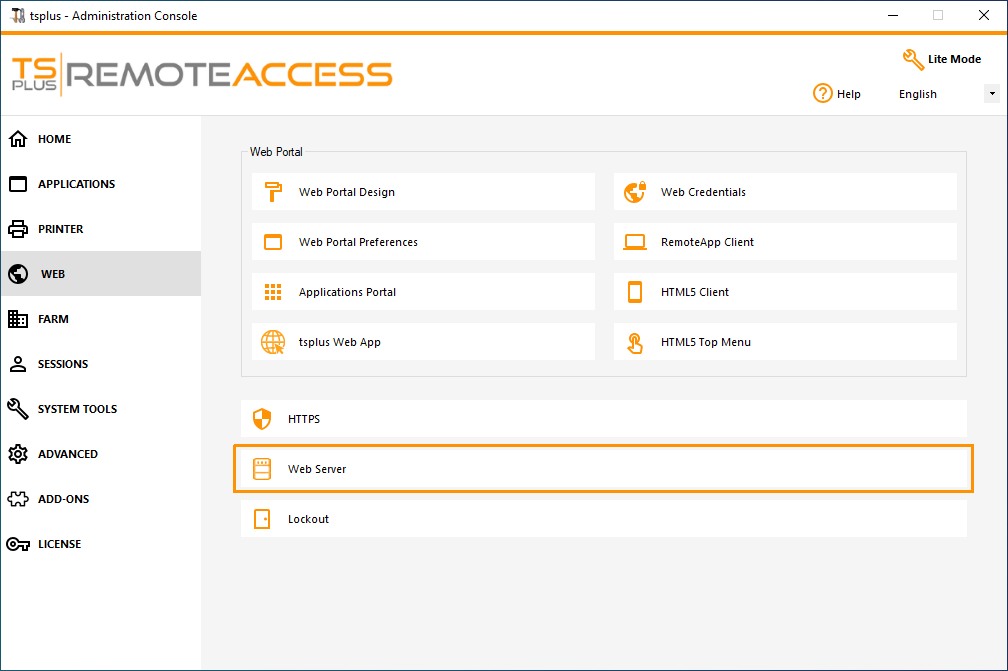
 I porti 80/443 possono essere modificati nella scheda Server Web:
 ### Passo 4: Pubblicazione dell'applicazione e controllo dell'applicazione.
Nell'AdminTool di Remote Access puoi assegnare applicazioni a utenti o gruppi.
- Se assegni un'applicazione a un utente, vedrà solo questa applicazione.
- Puoi anche assegnare loro la barra delle applicazioni TSplus, il pannello flottante o il pannello delle applicazioni per visualizzare più applicazioni.
- Puoi anche pubblicare un Desktop Remoto completo.
Ora disponibile in
Modalità Lite
dalla scheda principale.
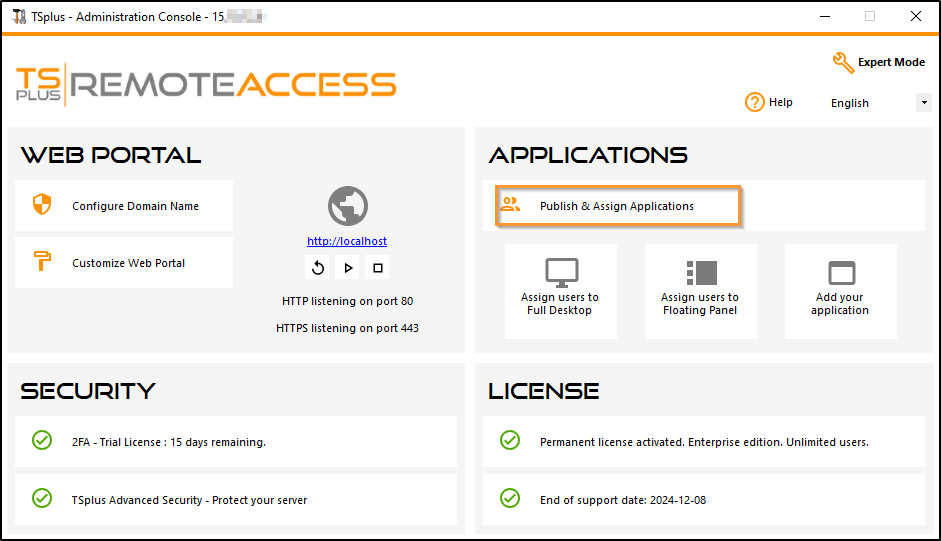
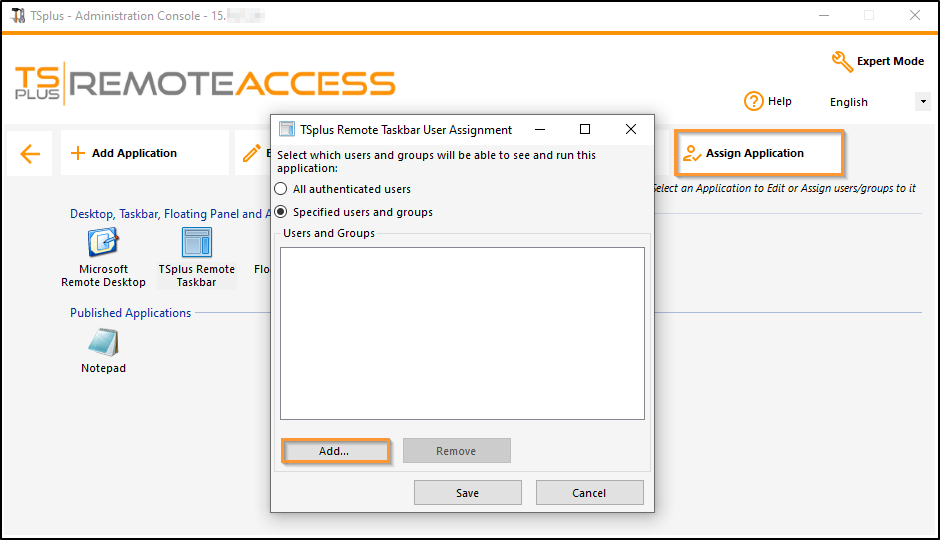
Oppure vai a Modalità Esperto > Scheda App per aggiungere, modificare, eliminare e assegnare app.
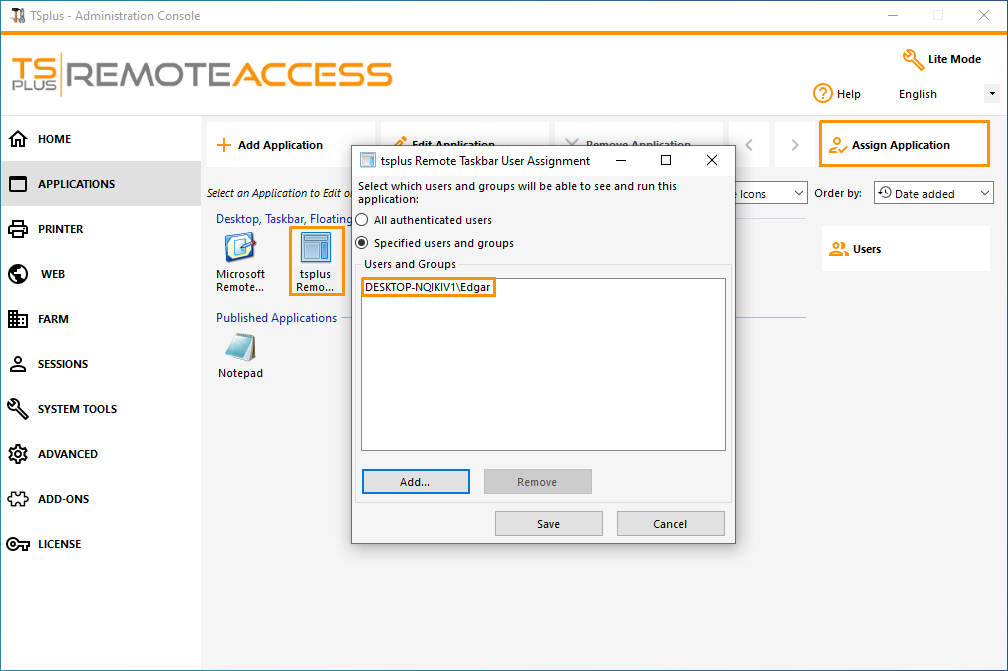
In questo esempio, l'amministratore ha deciso che l'utente 'John' avrà la TSplus Taskbar. Vedi questa documentazione per ulteriori informazioni.
Grazie per utilizzare TSplus Remote Access!